To manage network access to your EC2 instance, Amazon Web Services (AWS) provides various mechanisms to allow or block specific IP addresses. Here’s a step-by-step guide on how you can control access to your EC2 instances:
Understanding Security Groups and Network ACLs
Before diving into the specifics, it’s important to understand two key AWS components: Security Groups and Network Access Control Lists (ACLs).
- Security Groups: These act as virtual firewalls for your EC2 instances, controlling inbound and outbound traffic at the instance level.
- Network ACLs: These provide a layer of security at the subnet level, controlling traffic going in and out of one or more subnets.
What are Inbound and Outbound Rules?
Inbound: These are rules that control the incoming network traffic to your EC2 instance. Inbound rules define which traffic is allowed to enter the instance. For example, if you have a web server running on your EC2 instance, you would set an inbound rule to allow traffic on port 80 (HTTP) and 443 (HTTPS) so that users can access your website.
Outbound: These rules control the outgoing network traffic from your EC2 instance. Outbound rules specify what traffic can leave the instance. For instance, if your application needs to access an external database or API, you would set an outbound rule to allow traffic to the specific IP address or port where the database or API is hosted.
Step-by-Step Guide On Allowing or Blocking IPs Using Security Groups
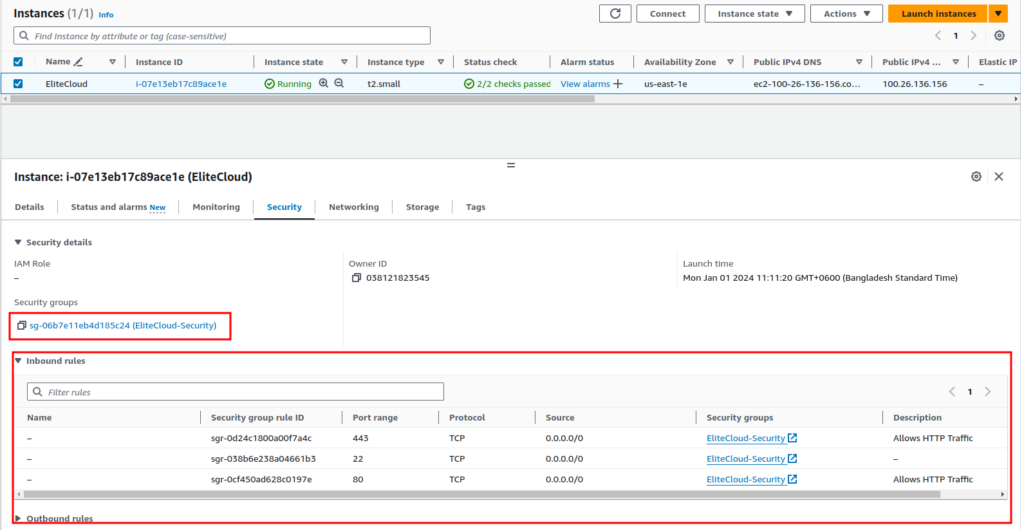
- Log in to your AWS console, and navigate to the EC2 service. From there click on “Instances” to view the available instances.

- From there Select the instance you which you want to allow IPs. Navigate to the “Security” Tab.

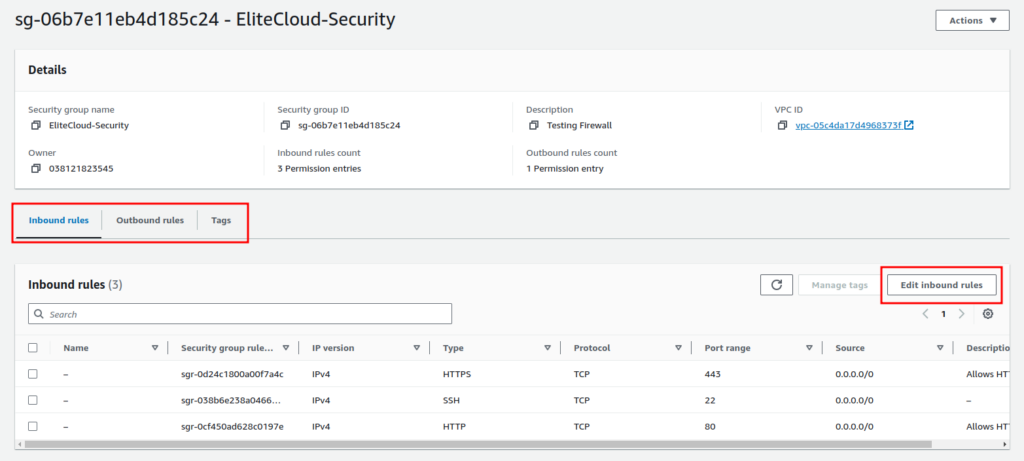
- Here you will see which “Security groups” are attached to your EC2 instance. And also be able to see all the inbound and outbound rules. Now click on the “Security groups” name. This will take you inside the security group.

- From there select Inbound/Outbound rules that you need. This example will show how to block all IPs from accessing your EC2 SSH (Inboound) expat for your own. Now, select Inbound Rules and click “Edit inbound rules”.

- The SSH will be created by default, In the “Source” click the drop-down and choose “My IP”.

- Click, “Save rules”. This will allow only you to access SSH. To block specific IPs, ensure you do not include them in your allowed rules. As AWS Security Groups are stateful and work on a whitelist model, meaning they deny all traffic except what you explicitly allow. To block specific IPs, ensure you do not include them in your allowed rules.
Step-by-Step Guide On Allowing or Blocking IPs Using Network ACLs
- Log in to your AWS console, and navigate to the EC2 service. From there click on “Instances” to view the available instances.

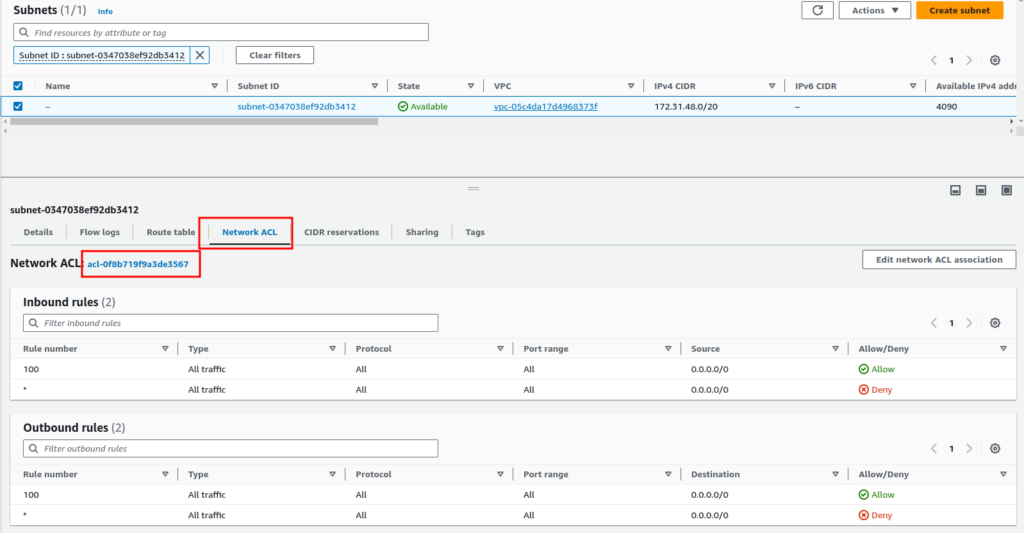
- From there Select the instance you which you want to allow/block IPs. From the detailed section click on “Subnet ID”.

- From there select the subnet, navigate to the “Network ACL” tab, and click on the “Network ACL” name.

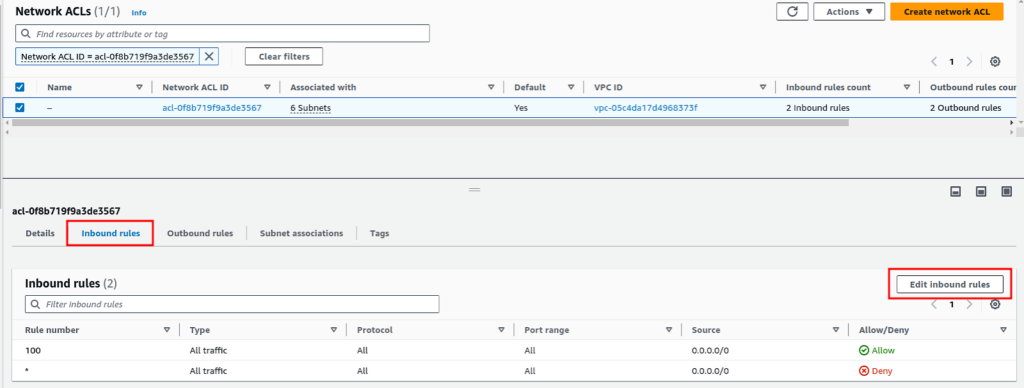
- Now select the “Network ACL ID” again. Navigate to the “Inbound rules” tab. And click on the “Edit inbound rules” button. Here we will deny all traffic from a specific IP CIDR.

- Now, click on the “Add new rule” button. Give it a “Rule number” (a rule number is the order in which the rule will execute with the priority from lowest number to highest). Give it “90” since we already have a rule with the number 100, so to deny an IP we need to choose a lower number so it executes first. Now in the “Source” give the IP CIDR, and select “Deny” in “Allow/Deny”. Once done click “Save Changes”.

This change will take effect immediately. The Network ACLs are stateless, and by default, the Network ACL rules allow all traffic in both directions.
Conclusion
By effectively using Security Groups and Network ACLs, you can precisely control who can access your EC2 instances. Always remember to balance security with functionality, ensuring that your configurations don’t inadvertently block legitimate traffic or expose your instances to unnecessary risks.

