In today’s digital world, websites have become central to our personal and professional lives. Whether for individual use or business purposes, the goal is to reach not just the local audience but also the global one. However, there’s a catch: the farther you are from the website’s server, the longer it takes for the website to load. This delay can be a critical factor in an increasingly competitive digital landscape. To bridge this geographical gap, we turn to a technology known as a Content Delivery Network (CDN).
What is Content Delivery Network (CDN)?
A CDN is essentially a network of servers strategically located in various regions and countries, encompassing a wide geographical area. When a CDN is employed, it stores a version of your website, known as a cache, on these servers. So, when someone requests your site, instead of retrieving it from the original server, which could be thousands of miles away, the CDN delivers the cached copy from a server closer to the user. This significantly speeds up the loading process, enhancing the overall user experience.

What is CloudFront?
Amazon CloudFront is a service provided by AWS that speeds up the distribution of static and dynamic web content, such as .html, .css, .js files, and image files, to users. CloudFront is a Content Delivery Network (CDN) that delivers content through a worldwide network of data centers known as edge locations. CloudFront aims to eliminate the data transfer delay between client and server. Instead, it allows users to connect to the nearest location where the nearest location (edge location server) connects to the main server. This is similar to the CloudFlare CDN.
Core Features of CloudFront
1. Global Content Delivery Network (CDN)
CloudFront has a wide network of edge locations around the world. This allows content to be delivered quickly and efficiently to users, regardless of their geographical location.
2. Integration with AWS Services
CloudFront integrates seamlessly with other AWS services, like Amazon S3, AWS WAF, Amazon EC2, and Amazon Route 53. This integration enhances the overall functionality and security of content delivery.
3. Caching
CloudFront caches copies of your content in edge locations for a duration specified by you. This means that when a user requests content, it is served from the nearest edge location, reducing latency and improving load times.
4. Dynamic and Static Content Delivery
CloudFront supports both static (unchanging) and dynamic (frequently changing) content delivery, making it a versatile choice for different types of web content.
5. Security
CloudFront offers several security features, including HTTPS support for encrypted data transfer, integration with AWS Shield for DDoS protection, and the option to use AWS WAF for filtering malicious web traffic.
How to use CloudFront With Amazon S3?
In this demonstration, we will set up CloudFront in front of a S3 bucket that represents a static website. If you need to learn how to set up a S3 bucket we recommend you check out our article on S3. Or you can create a new bucket from the “S3” setup page. Now click “Crate bucket”.

From the previous S3 article, you should already know the meaning of each field here. Just Fill in the bucket name, keep everything else default, and click “Create bucket”.

This will create the bucket. Now get inside the bucket by clicking the bucket name and upload your website files. Here I’ve uploaded a simple html file with a CSS and an image file.

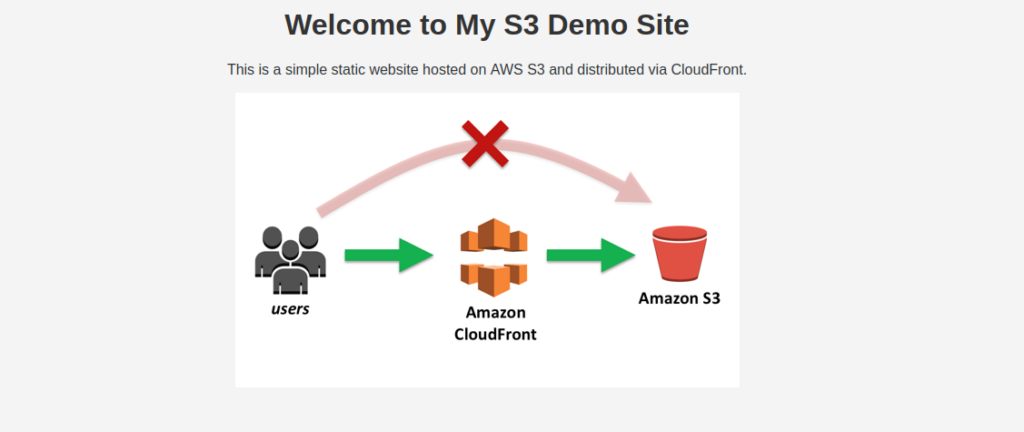
This is what the website looks like.

These files are not accessible publicly. So you won’t be able to access them.
Now let’s navigate to CloudFront and configure it with this S3 bucket. This will allow us to access the S3 bucket through CloudFront but not directly.

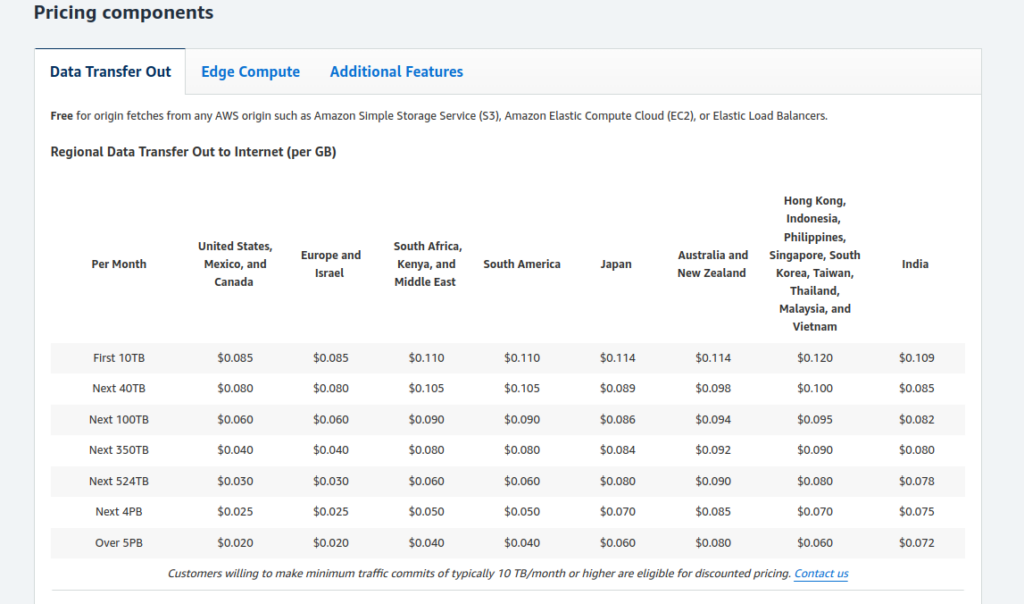
From there you click on the “Create a CloudFront distribution button. AWS CloudFront comes with a free tier eligible where each month you can transfer a specific amount of data and web requests.

And if you exceed the free limit usage, you will have to pay a predefined charge. You can get the detailed pricing of AWS CloudFront here.

Once you click the “Create CloudFront distribution” button it will take to you the CloudFront setup, where you will have to create a distribution select the origin, and configure the CDN.
In the “Origin domain” field search for “S3” and select the bucket you want to use in CloudFront.

Keep the “Origin path” and “Name” as it is from the “Origin access” and change them to “Origin access control settings (recommended)”. This will ask you to select an “origin access control” If you don’t have one, you can create it by clicking “Create control setting”.

Inside the “Create control setting” keep everything default you can add an optional description there, and click “Create”.
Next, Keep the “Add custom header” and “Enable Origin Shield” to default. In the “Default cache behavior” section you can control the caching, the protocol, http methods, caching policy, and some other additional settings. For this demonstration, we can go with the default settings.
Skip the “Function associations” section as it is optional. In the “Web Application Firewall (WAF)” section select “Do not enable security protections” ” as we want this demonstration to be simple and easy. You may check our dedicated article on AWS WAF.

Now in the settings section keep everything default, and come to the “Default root object” and enter “index.html” as this will be the default root object. This thing is optional but it’s better to specify the root file.
Now click on “Create distribution”.

This might show you an error similar to this.

In this case, you have to submit a support case for service limit increases. You can do this by following the provided link, and within an hour AWS support will fix this issue and you will be good to go.
After successfully creating the CloudFront distributor, you need to copy the S3 policy from the yellow alert.

And open the S3 bucket permission link in the new tab.

From there you need to click on the “Edit” button in bucket policy.

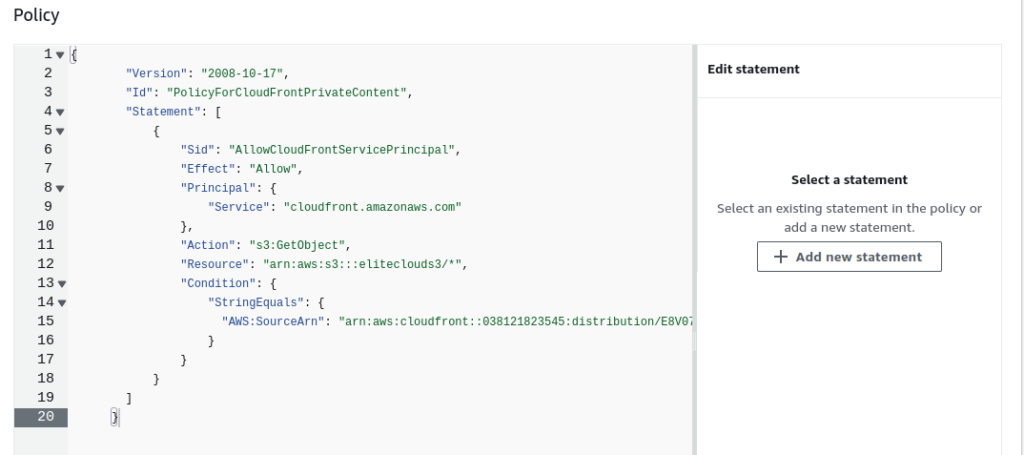
Now paste the policy you copied from the CloudFront page. It will look like this.

This policy will allow CloudFront to access your specified bucket and read the objects from the bucket using the “GetObject” permission. Once done click on “Save changes”, and your done with S3.
Now get back to the CloudFront setup page and check the Last modified date. If you see a date and time, that means everything is complete.

You can now copy the distribution domain name and access the website using CloudFront.

This will load the website from Cloudfront cache servers. This also adds https to your website. Now this might not reveal any significant difference with a lite webpage like this. But when you have a big website and files, you will be able to notice the difference.
How to use CloudFront with Amazon EC2?
To use CloudFront in front of an ec2 instance you need to already have an ec2 instance with a website hosted in it. If you don’t know how to create an ec2 instance you are recommended to check out our article on EC2.
Now navigate to the CloudFront home page. Click on the “Create Distribution” button.

In the origin domain paste your ec2 instance public IP or AWS given DNS name.

Keep everything else in this section as it is. In the “Default cache behavior” select the “CacheOptimized” policy settings.

You can also create a custom cache policy and configure it according to your needs. Now let’s keep everything default to the “Web Application Firewall (WAF) section. Select “Do not enable security protections” in the WAF section.

Keep everything else default and click on “Create distribution”. Remember you can always change most of the settings after creating the origin distribution. This will take some time to deploy the service. Once it’s done you will be able to see the last modified date in place of deploying status.

Once it’s done copy the distribution domain name and you will be able to access the ec2 website using Cloudfront.
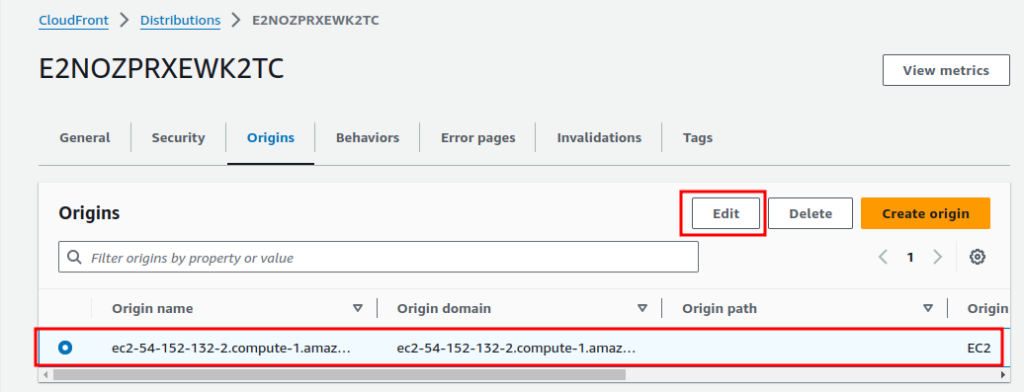
If you are facing some kind of error. Navigate to the “Origins” inside the distribution. Select the origin name and click on “Edit”.

Change the protocol to “HTTP” only and save.

And the issue should be fixed. Now let’s compare the before-after speed of the website. First, we browse the website directly using the ec2 URL.

Here the response time is “774 milliseconds (ms)”. It’s the total time that took to load the website.
Now browsing the CloudFront cached domain URL. We can see that the response time is reduced to only “17 ms”.

This was just a static website demo. In the actual production website, there will be hundreds if not thousands of requests going in the backend. And using a CDN like CloudFront speeds up the website significantly.
Please note that this demonstration was not for a production environment. It’s recommended to set up and configure these services following the AWS official documentation by AWS cloud experts.
Cleaning up
Once you are done with the CloudFront or any other AWS service. It’s recommended to stop or remove the resources so it doesn’t cost you for an ideal run.
For the EC2 instance, I’m simply going to stop the instance. This can be done by selecting the instance and clicking on Instance state > stop the instance.

Next for S3, go to the S3 homepage, select Buckets, select the S3 bucket you want to remove, and click on “Empty”. This will ask for confirmation just type “permanently delete” there and hit enter. This will take some time and remove the objects from the S3 bucket.
Now get back to the bucket home and select the bucket. This time click on the “Delete” button.

Confirm by typing the bucket name and clicking on “Delete bucket”.

This will delete the S3 bucket.
For Cloudfront get inside the Cloudfront distributor home. Select the distributions you want to delete. Now click “Disable”.

Follow up on the confirmation. This will take some time. Once you see a date in the “Last modified” field you can select the distributions again and click on the “Delete” button.

Follow up on the confirmation and the distribution will be deleted from your account. You can confirm the deletion by going to the distribution home page again.

Conclusion
Amazon CloudFront stands out as a vital service for optimizing website performance and content delivery. By leveraging its global network of edge locations, CloudFront significantly reduces latency, ensuring that users worldwide can access web content quickly and reliably. CloudFront’s seamless integration with other AWS services, combined with its robust security features, makes it an indispensable tool for anyone looking to deliver content effectively on a global scale.

